


Getting Started
Welcome to the Spinfire App Guide! Whether you’re a beginner or seasoned player, the Spinfire App is designed to provide you with an easy and efficient way to customize and manage your training.
Download and Installation

For iOS Users
Using your iPhone, click the “App Store” link below

For Android Users
Click the “Google Play” link below
or
- Open Google Play on your device
- Search for “Spinfire App”
- Tap “Install” and follow the prompts to install the app

Getting Connected
- Turn on your ball machine
- Ensure Bluetooth is enabled on your device
- Open the Spinfire App on your device
- Click the red Bluetooth icon in the top right corner
- From the “Bluetooth Connection” page, find your device and choose “CONNECT” *
- Your app will confirm your device is now “Connected to Spinfire”
- You can now “DISCONNECT” or use the back button in the top left corner to navigate to the “Remote” page, now showing a green Bluetooth icon and your machine’s battery life
* You will notice a signal strength value to the left of the available machines, if there are multiple machines to select from, the lowest value represents the closest machine. For example, -68 would be closer than -83.
App Basics
When you open the Spinfire App for your first training session, we recommend taking a look around. Here, we’ll introduce you to the main pages, walk you through the different options and deep dive into how to get the most out of your personalized app experience. For iPhone and Apple Watch users, please check out the Apple Watch section below for watch specific information.
Every page features the Header, the Control Bar and the Navigation Bar.
- Header
- Control Bar
- Navigation Bar
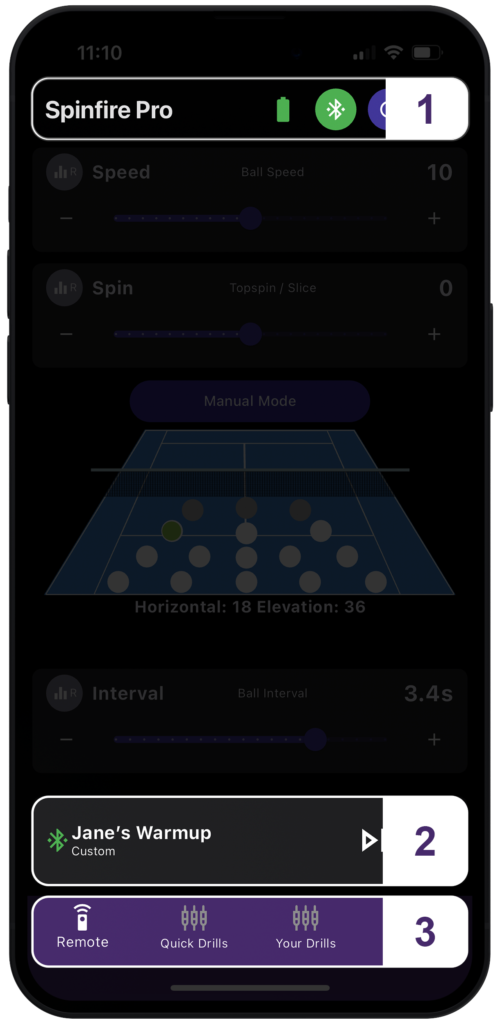
Header
The Header features your page title, Bluetooth Connections button (and when connected to your machine it’s battery life is displayed), a reset button that centres your machine and Sleep Mode button. The Header displays where you are in the app and features the back button in the top left when needed to help navigate the app.
Control Bar
This is the main control for your machine and displays across pages, helping you to keep track of your current mode or drill and giving you access to the Feed and Play button for full control while navigating the app.
Use the Control Bar to feed the ball, start and pause your current settings or drills and get a quick look at your currently active settings or drills.
- Bluetooth icon
- Green icon indicates it’s connected, red icon indicates it’s disconnected
- Text
- Describes the status of the mode / drill currently being played
- Feed button
- Press the Feed button for a single ball to fire, the machine then pauses automatically
- Play button
- Press the Play button to start the balls feeding using your current settings and drills.
- Press and hold the Play button to access the delayed countdown feature and choose the delay in seconds you would like to add before the balls start firing
Navigation Bar
There are 4 pages featured in the Navigation Bar, here you can make quick selections to make adjustments to your training session:
- Remote
- Quick Drills
- Your Drills
- Settings
Pages
Remote
This is the first page when you open the app. You will see a slider for Speed, Spin and Interval, a button for “Manual Mode” and a visual of a court with white clickable ball locations and a preview of the Horizontal and Elevation values.
Clicking “Manual Mode” will switch the view to include two additional sliders – Elevation and Horizontal – in place of the Court Map. “Switch to Court Map” can be clicked again to switch the view back to the Court Map.
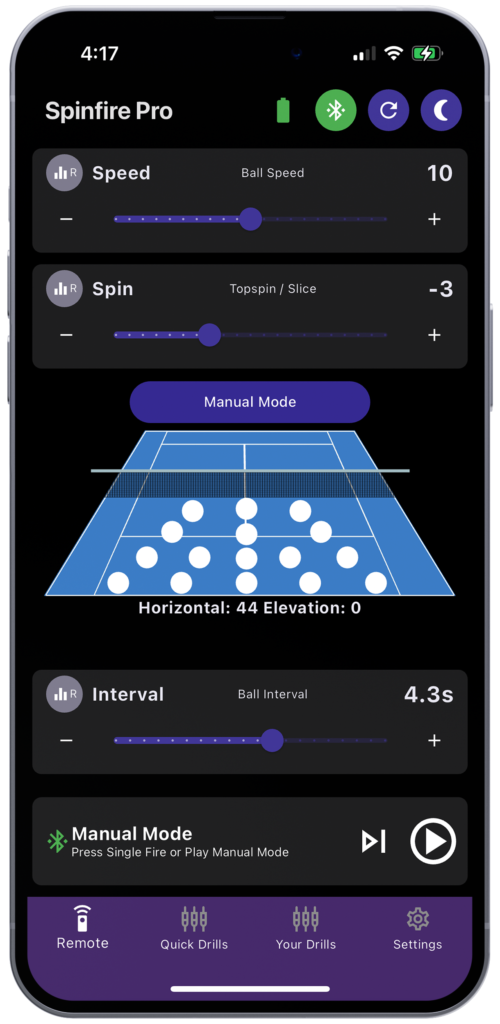
Speed
This slider adjusts the Ball Speed from 20 mph / 32km/h to 80 mph / 130km/h, this is represented on the slider as values from 0 to 20.
Drag the slider to adjust the Ball Speed or click the “-” or “+” buttons at either end of the slider to make incremental adjustments.
The “R” button to the left of “Speed” can be clicked to enable “Random Speed”. This will randomly vary the Speed level by a +/- 1 value. Its enabled state is represented by a colored icon. To disable, click again and Random Speed will be disabled and turn the icon gray.
Spin
This slider adjusts the Topspin / Slice of the ball. The values range from -10 to +10 with 0 producing flat balls, -10 producing maximum slice and +10 producing maximum topspin. Vary the slider between values to set milder levels of spin.
Drag the slider to adjust the Topspin / Slice or click the “-” or “+” buttons at either end of the slider to make incremental adjustments.
The “R” button to the left of “Spin” can be clicked to enable “Random Spin”. This will randomly vary the Spin level by a +/- 1 value. Its enabled state is represented by a colored icon. To disable, click again and Random Spin will be disabled and turn the icon gray.
Interval
This slider adjusts how often the balls are ejected from the machine at Intervals of every 15.1 seconds to every 1.9 seconds.
Drag the slider to adjust the Interval or click the “-” or “+” buttons at either end of the slider to make incremental adjustments.
The “R” button to the left of “Interval” can be clicked to enable “Random Interval”. This will randomly vary the Interval by +/- 0.5 seconds. Its enabled state is represented by a colored icon. To disable, click again and Random Interval will be disabled and turn the icon gray.

Manual Mode
Elevation
This slider adjusts the Elevation of the ball. The values range from 0 to 200 with 200 representing the highest elevation often used for lobs.
Drag the slider to adjust the Elevation or click the “-” or “+” buttons at either end of the slider to make incremental adjustments.
The “R” button to the left of “Elevation” can be clicked to enable “Random Elevation”. This will randomly vary the Elevation. Its enabled state is represented by a colored icon. To disable, click again and Random Elevation will be disabled and turn the icon gray.
Horizontal
This slider adjusts the Horizontal position that balls are ejected to from left to right. The values range from -37 to +37 with 0 at center position, -37 at far left and +37 at far right. Vary the slider between values to customize the position on court.
Drag the slider to adjust the Horizontal position or click the “-” or “+” buttons at either end of the slider to make incremental adjustments.
Switch to Court Map
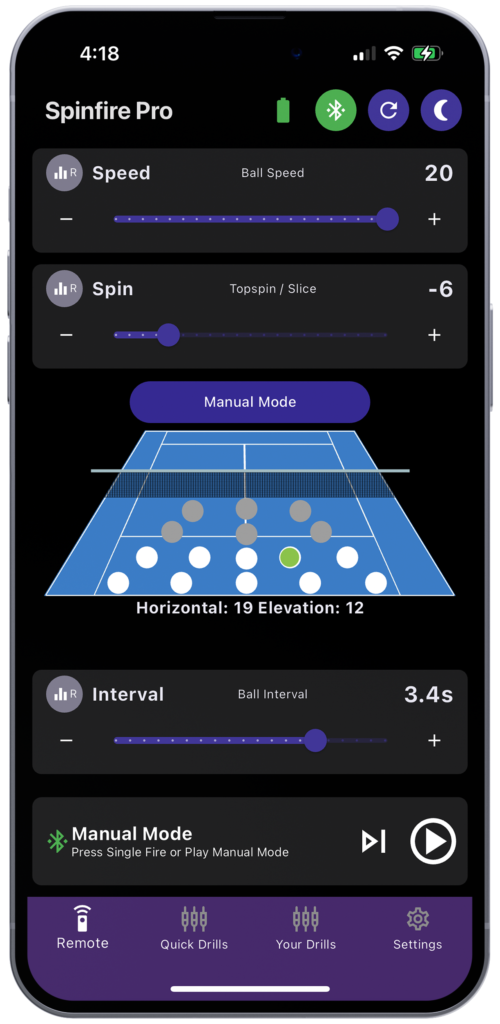
Court Map
This illustration displays 16 spots that represent the position you would like your ball to land on court. Select a position by tapping the relevant spot – it will fill green representing it has been selected. The approximate Horizontal and Elevation values will be displayed beneath the illustration. You will notice that if you adjust the Speed and Spin sliders, certain spots on the court will be grayed out and not able to be selected due to the new values excluding certain positions on court. If you find shots are not hitting the locations on the court map, you may need to calibrate your machine.
Quick Drills
Here you’ll find a quick way to jump into simple drills with toggles for Vertical Random, Horizontal Random and 2 Line or Custom Drills. Switch back to the Remote page as needed to randomize or fine tune specific settings.
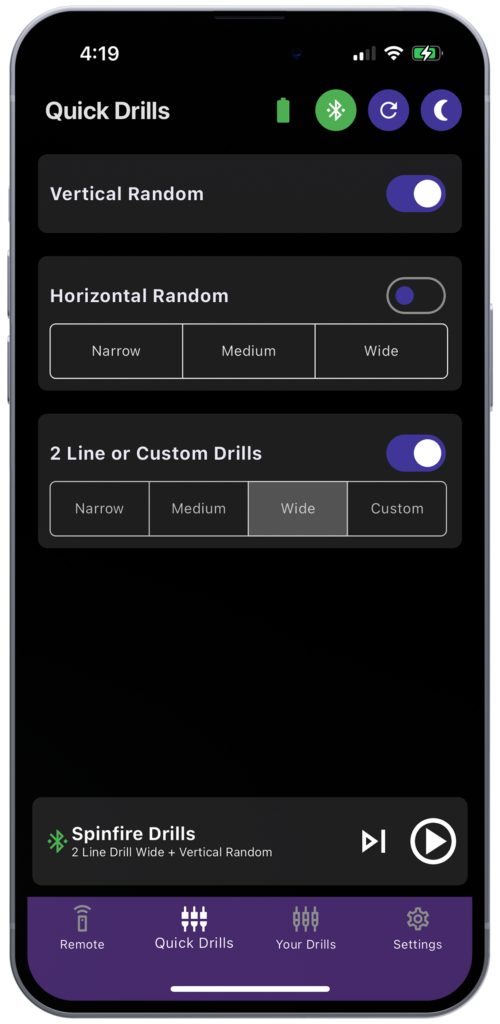
Vertical Random
Tap the toggle to enable, toggle turns white and moves right. The machine will randomly fire short and deep balls to different depths. This setting will adjust the elevation height, randomly choosing when to shoot a higher / deeper ball and a lower / shorter ball.
For example, you may get 3 deep balls followed by 2 short balls, then 1 deep ball and then 3 short balls – completely randomized.
This setting can be enabled in combination with Horizontal Random or 2 Line or Custom Drills. Tap the toggle again to disable, toggle moves left and turns purple.
Horizontal Random
Tap the toggle to enable, toggle turns white and moves right. The machine will fire balls randomly within the horizontal width you choose – from Narrow which is the easiest, a short step side to side to Wide which is the most difficult, shooting balls to the full width of the court.
Combine this with other random settings like Vertical Random for more challenging practice.
Tap the toggle again to disable, toggle moves left and turns purple. Setting will also be disabled if activating a competing setting like 2 Line or Custom Drills.
2 Line or Custom Drills
Tap the toggle to enable, toggle turns white and moves right. The machine fires balls alternating between a forehand and backhand at the set width chosen. Narrow is the easiest, a short step side to side and Wide is the most difficult, shooting balls to the full width of the court.
Combine this with other random settings like Vertical Random for more challenging practice.
Tap the toggle again to disable, toggle moves left and turns purple. Setting will also be disabled if activating a competing setting like Horizontal Random.
Random Drill
Achieve totally random deliveries of varying depths and widths by activating both Horizontal Random and Vertical Random. You can also randomize Speed, Spin and Interval as described above on the Remote page.
Your Drills
This page is the powerful and personalized hub of the app. Here you can create and save custom drills, bulk edit, duplicate and adjust multiple custom shots and create drills with a prompt using our AI Drill Creator.
When first navigating to this page, you will notice some pre-loaded custom drills. These can be reordered, edited and sent to your machine for play.
Organise and Edit Your Drills
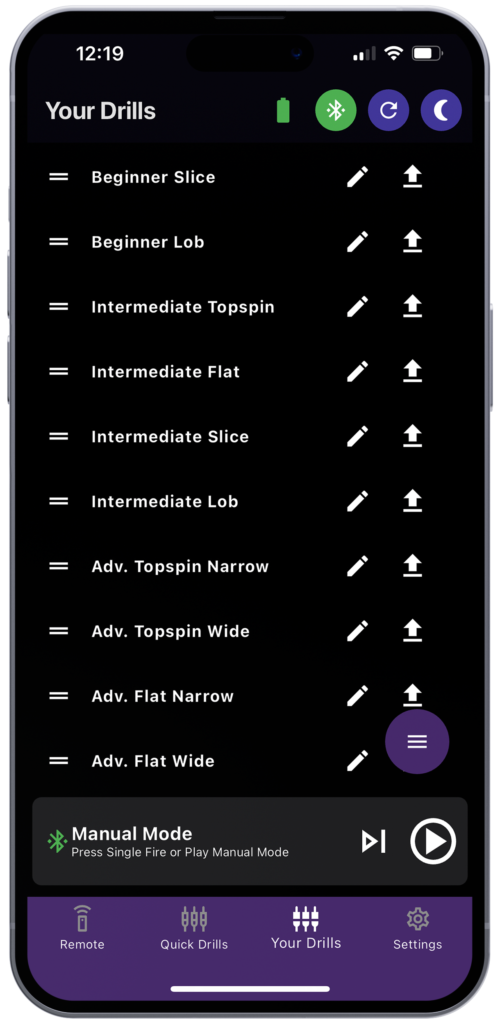

Drag and Drop
Drag and drop to reorder your drills

Edit Drill
Click to edit, change the name, Modify All Shots, delete, duplicate, modify and feed shots

Send Drill
Send drill to machine
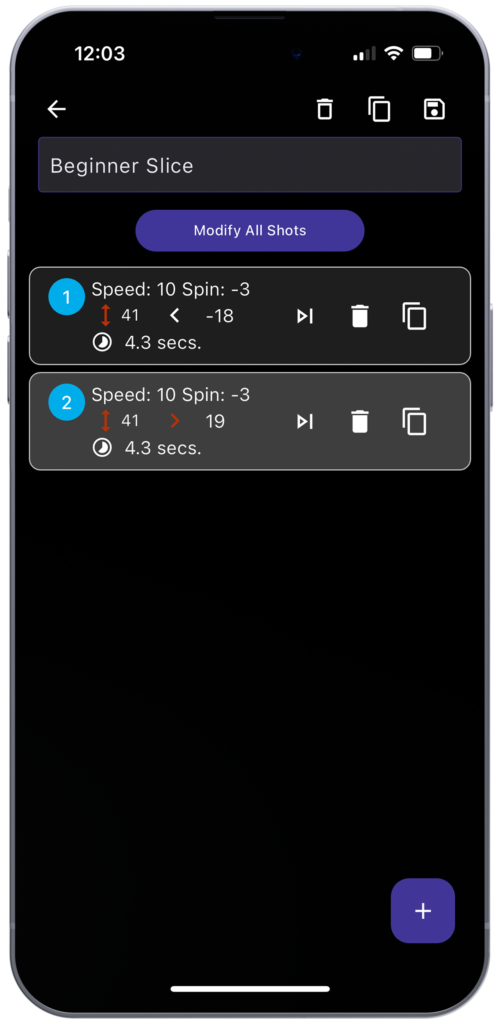
Edit Drill
Change the name
Click into the title bar to edit the name
Modify All Shots
This button bulk edits all shots in the drill
Shots
Each shot tile is numbered, has a preview of the shot settings and has three buttons, from left to right – Feed, Delete and Duplicate.
Click the shot tile to adjust the settings, click again to collapse the tile.
Add shot
Use the plus (+) button in the bottom right corner to add an additional shot and make adjustments as needed.
Header options
Delete, Duplicate or Save changes to the drill. Use the back button to return to Your Drills.
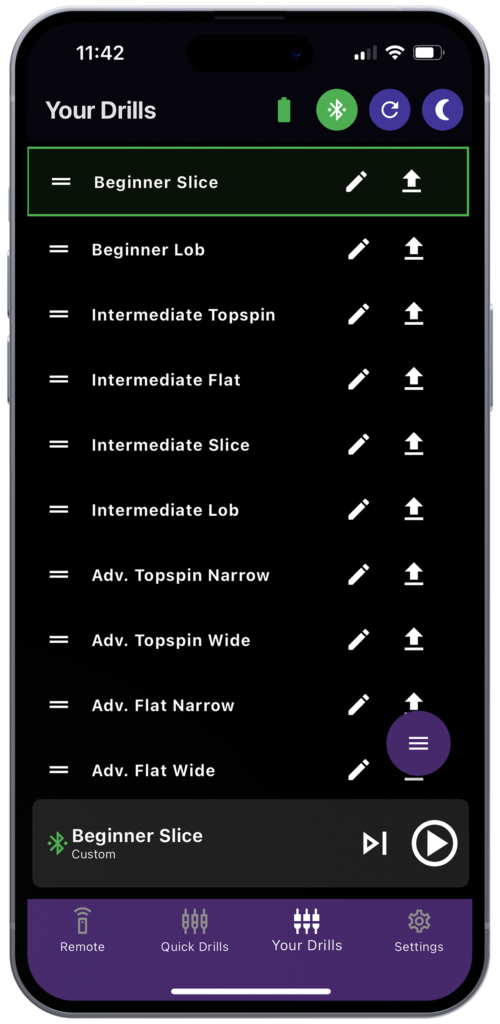
Send Drill
Click the Send button to send the drill to your machine for play, the drill will be highlighted green to confirm it’s active. The drill will appear on your Control Bar, click the Play button when you’re ready to start the drill.
Your Drills Menu

Menu
Contains options to export and import drills and create new custom drills.
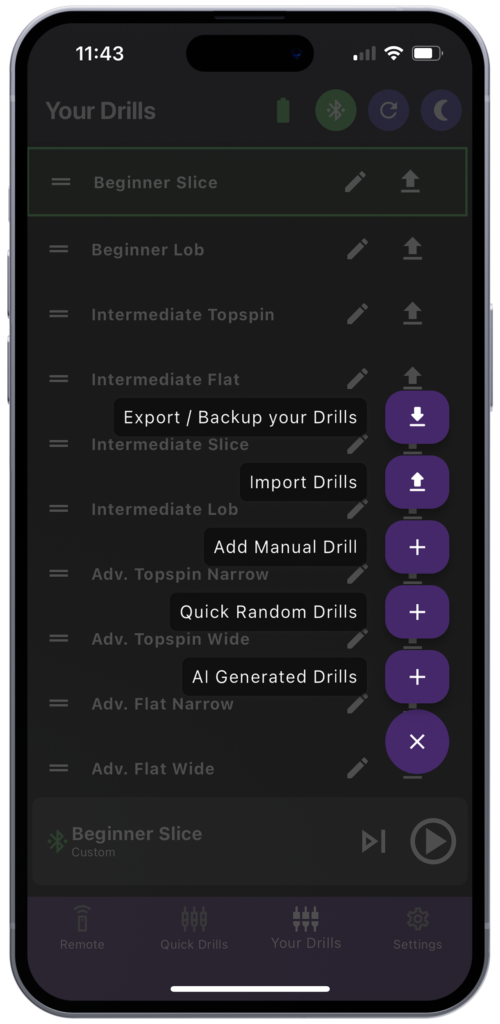
Export / Backup your Drills
Export to backup or share your drills with friends. Click this button and you’ll be prompted to save or share your drills via a json file which can be imported again from this menu or your friend can import into their own Spinfire App.
Import Drills
Click this button and be prompted to “Reset Drills to Default” or “Import Drills from File”. If choosing the later you’ll be asked if you’d like to delete all existing drills before importing, you can choose either option and then your devices file manager will pop up to select drills to import.
Add Manual Drill
Manually add a drill from scratch, this screen works the same as the existing drills Edit screen explained earlier.
Quick Random Drills
Add drills quickly with this option – includes sliders for Speed, Spin, Elevation, Horizontal, Interval and How many shots to create for this drill. Click “Generate Drill” when you’re happy and find your drill added to the Your Drills page. Click “Send drill to machine” to get started. `
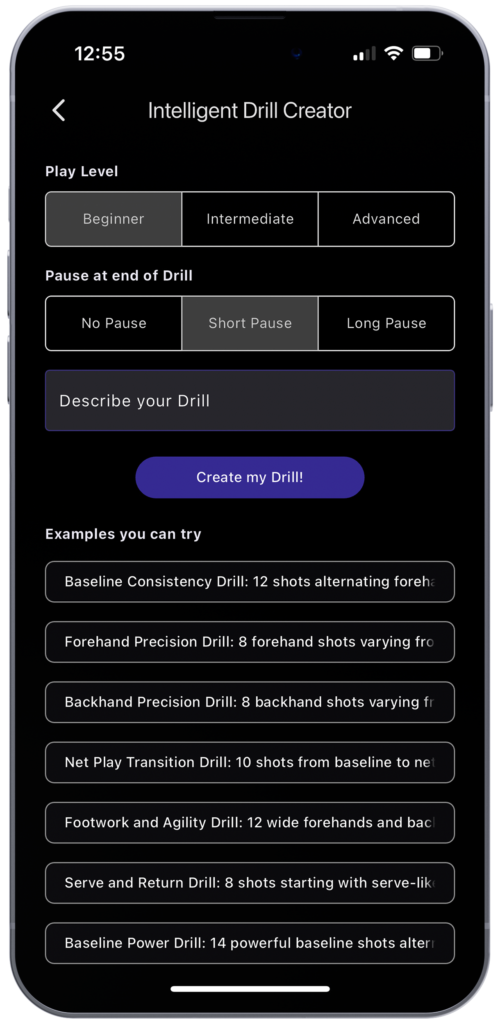
AI Generated Drills
Advanced AI Drill Creator creates drills from prompts. Simply select your Play Level – Beginner, Intermediate or Advanced and then the Pause at end of Drill – No Pause, Short Pause or Long Pause, then click into the text box to Describe your Drill or select from the list of Examples you can try. Now click “Create my Drill!” and watch as the Intelligent Drill Creator works on your drill. Once finished a green box will appear with the drill’s name confirming it’s been successfully created. Find it on the Your Drills page and tap the Send drill to machine button to get started immediately or click the Edit button to refine shots.
Settings
Here you have access to your settings, advanced settings and your motherboard and app versions.
Dark Mode
Toggle Dark Mode on and off.
Versions
Motherboard version is displayed on top, App version below.
Check for Updates
Clicking “Check for Updates” will result in one of the below:
- If you are not connected to the internet, you will get a message asking you to connect
- If you are not connected to the machine, you will get a message asking you to connect
- If you are fully connected the following will show, click the button to update:
- Current Version: 6.2.8 (example)
- Latest Version: 6.2.9 (example)
- “Update Firmware” button
Change Language
Our app currently supports:
- English
- Spanish
- German
- Chinese
Single Ball Fire Mode (SBF)
This feature enables firing a single ball. This is useful in coaching sessions for giving instructions to students, firing a single ball and providing feedback. It’s also handy for testing shots you’re setting up and firing one ball to check the settings.
Advanced Settings
This is where you’ll find more technical settings or troubleshooting options.
Feeder Safety Mode
Toggle on / off
Sensitivity Settings
This section explains the sensitivity settings for your machine. Increasing each of these values makes the system more sensitive, which may lead to false detections:
Ball Jam Sensitivity
Slider from 0 to 20
Adjusts how sensitive the system is to detecting ball jams. Higher sensitivity increases the likelihood of false ball jam detections.
Ball Fire Sensitivity
Slider from 0 to 20
Controls how sensitive the system is to detecting ball fires. Higher sensitivity can result in more frequent false ball fire detections.
Feeder Sensitivity
Slider from -20 to +20
Determines how quickly the system detects feed jams. Higher sensitivity causes the system to detect feed jams earlier, which may increase the chance of false feed jam detections.
Note: Adjust these settings carefully. While higher sensitivity can help detect issues sooner, it also increases the risk of false alarms.
Battery Type
SLA
Sealed Lead Acid Battery Profile 10.8V cutoff to 12.1V when fully charged.
Default Lithium
Default Lithium Phosphate Profile has low voltage cutoff at 12.0V and full battery at 13.2V
Alternative Lithium
Alternative Lithium Profile for some alternative lithium batteries that run at 11.5V to 13.0V
Reset Settings
Clicking the “Reset” button will reset the settings back to the following:
- Set the Interval to 1
- Set the Speed to 0
- Set the Spin to 0
- Set the saved Elevation to 50
- Set the Feeder Safety Mode to On
- Set the Single Ball Fire mode to Off
- Set the datum side to default
- Set the Ball Jam Sensitivity to the default value
- Set the Ball Fire Sensitivity to the default value
- Set the Feeder Sensitivity to the default value
- Enable Bluetooth
- Disable any random mode that is set
Apple Watch
For iPhone and Apple Watch users, your Apple Watch becomes an extension of the powerful Spinfire App on your iPhone. You will notice the watch is synced live with your iPhone – the same active drill is displayed on the Main Control page as on your iPhone and the Drills page contains all of your saved Drills from your iPhone.
❗To ensure your Apple Watch works correctly and stays connected throughout your training session, please ensure your iPhone and Apple Watch are within normal Bluetooth range of each other (about 33 feet or 10 metres).
There are 3 pages on the Spinfire App for Apple Watch:
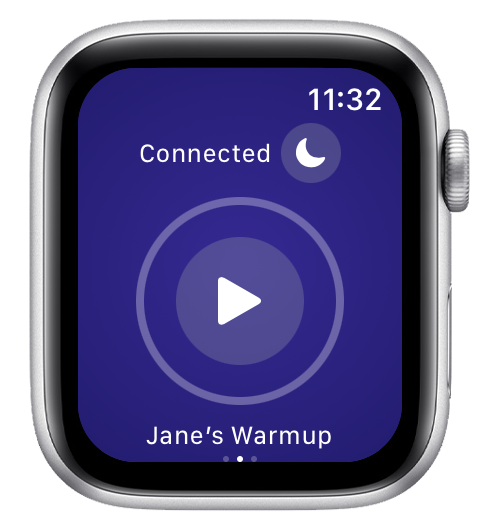
Main Control (watch middle screen)
This is where you can:
- Check connection
- Use Sleep Mode
- Play current setting / drill
- View current / recent drill
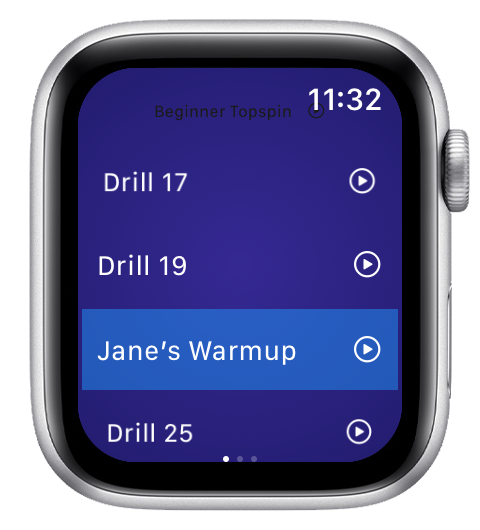
Drills (watch left screen)
Browse and select from drills saved on your iPhone
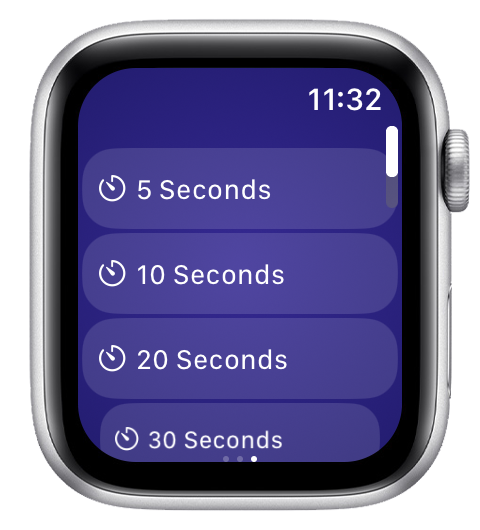
Delay (watch right screen)
Set a delay countdown before the balls start firing
To continue with the smartphone section of this guide, please click here to skip back to the App Basics section.
Have any further questions or feedback? Please feel welcome to reach out to our friendly team anytime!