|

|
This article relates to v1 machines only. To determine if you have a v1 machine, please read this article here. If you have a v2 machine and need assistance troubleshooting this issue, please check this article here.
If you are experiencing a “Top motor error, please check for ball jam” or “Bottom motor error, please check for ball jam” then this video, or the text instructions below it, can help you troubleshoot the issue:
With the machine off and elevation at its lowest, please do the following:
- Check to see if there are any obstructions to the wheels.
- Make sure that the wheels can spin freely (try turning them by hand to see if they are rubbing on anything).
- When a wheel is installed on the axle, it should leave 1 to 2mm of space between the wheel and the motor housing. If the wheel is hard up against the motor housing, it can rub causing this error. Try removing the wheel and re-installing it with the correct spacing to see if it can resolve this issue.
- Check the reset switch under your machine (next to the master power switch) and press it (if it doesn’t click, then this was not the problem).
- Check each of the tyres on the throwing wheels to see if they are in good condition. If they are damaged, they can throw out the balance of the wheels which will cause a throwing motor error.
- Check to see if the tyre is coming away from the core of the wheel (see if you can pry it away on both sides).
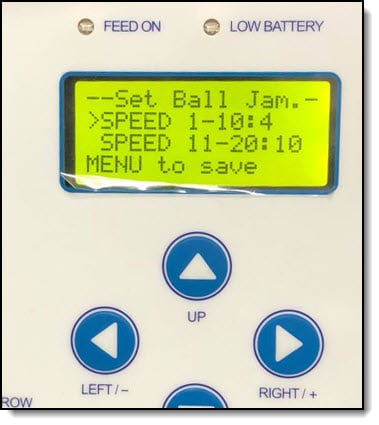
- If you have software version 3.0.0 through to 3.6.6 (not available in later versions), you can try adjusting the sensitivity of the motors down to 10 to see if this corrects the problem. Occasionally, a machine may display an error relating to a throwing wheel such as “Top motor error, check for a ball jam.” However, there is no ball jam. This can be caused by over sensitive software, trying to detect a ball jam but instead giving a false error message. To assist with this problem, a feature was temporarily added to the software to reduce the sensitivity of this throwing wheel motor jam detection. You can turn on the machine by pressing “power + left + right” to access this function. By default, the sensitivity is set to 1 which is the highest. To decrease the sensitivity, simply increase the number to 2 – 10 depending on what is required to prevent the error message from displaying falsely. Please note, this sensitivity adjustment was experimental and has since been removed, but it may still work if you have the correct software versions (in newer software versions, a similar menu now exists which says SENSITIVITY, but it’s unrelated to this issue and won’t help you). The sensitivity can be adjusted for low speeds 1-10 or high speeds 11-20. We recommend to start by increasing both to the same number. To increase the value, used the RIGHT / + button and to decrease it, use the LEFT / – button.

The menu must look like the above for this setting to be helpful. Do not make any adjustment if the menu doesn’t look like the above (the values 4 and 10 may be different which is OK). - Try swapping the motors by switching the wires from the top to the bottom and vice versa (please watch the above instructional video for more details on how to do this). Does the error message change to the other motor? For example, if you were receiving a “Top Motor Error”, does it now become a “Bottom Motor Error”? If it does change, then the problem is the motor. If it does not change, then the problem is most likely the motherboard.
- If YES, try plugging in a new motor (don’t install it, just hold the motor in your hand for this test) and seeing if it resolves the issue. If it does, install the motor to finalise the repair.
- If NO, try a new motherboard which will hopefully resolve the issue.
If none of the above resolves the issue, please contact your local Spinfire distributor for further trouble shooting support.


